

Have you ever wanted to make an Attic Window Quilt?
Now you may be saying what the heck is that? Fair Enough!
An Attic Window quilt uses the Attic Window block. This is a great block to use with panels or with one of those prints that have a lot of “pictures” in it. Some great examples would be:


The above samples would make great attic window blocks.
For my quilt, I used a panel I purchased many years ago. You know the kind, or maybe you don’t. The panel that you love and put aside and say one day I will do something with you. Well, I finally decided to “do something” with that my panel.
Unfortunately, I forgot to take a photo of the panel before I decided to cut into it. Not sure what I was thinking there. Obviously, I wasn’t thinking.
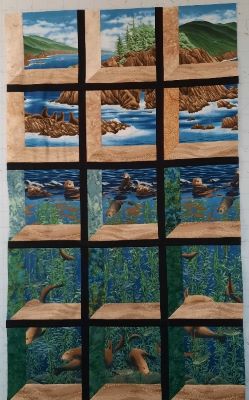
Anyway, I loved the panel as it reminded me of childhood RV trips down the Oregon Coast and visiting the sea lion caves.
Table of contents
The Attic Window Block
If you don’t know what an Attic Window Block looks like here are some examples. These were created in Electric Quilt 8 design software.


You can see why this block is so great for using panels or those picture print fabrics that would completely loose their impact if cut up into smaller pieces.
Anatomy of an Attic Window Quilt
An Attic Window Quilt consists of the blocks above which have the window and then two sashes. The quilt will be put together with a “frame”. This “frame” would be the sashing in a different style of quilt.
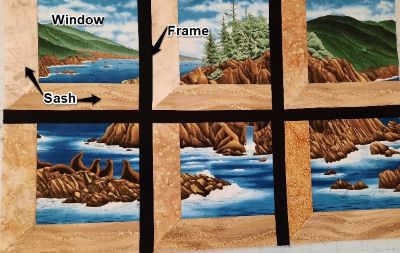
The “window sashes” should have one side darker than the other to look like the sun is shining into the window and shading one side.
This gives dimension to the block.
In the quilt top above I used one fabric for the bottom of the sashes and then used a different fabric as we moved down under the water as the light would be different down there. Notice how the sashes up a darker green as the shadows under the water would be darker down there.
I chose a black for the frame on the windows, the first border around this top will be done in the same black fabric.
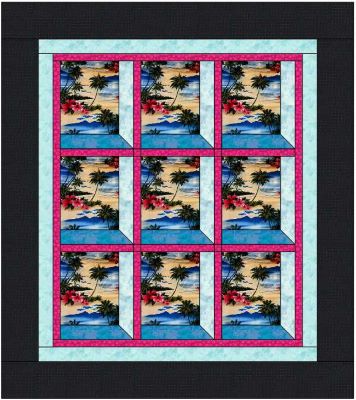
The second picture is an attic window I designed in Electric Quilt 8 using the Tropical Paradise Fabric I have. I can’t remember where I picked this fabric up from however it may have been on a trip to Hawaii.
Notice that in this quilt I reversed the windows sashes to the right of the block and used a lighter valued fabric on the sides to have the light come from a different angle.
For this quilt top, I used the same fabrics in the sashes for all the blocks. For the “frame” I chose a fuchsia colour to pick up on the colour of the hibiscus flowers.
Designing an Attic Window Quilt
Designing an Attic Window Block or Quilt is not that hard. It does require a bit of math though. There are three main pieces you must make decisions on
These are
- What size do you want your “windows”
- How wide do you want to make your sashes (usually 2 to 2.5 inches finished)
- How wide do you want your frame to be (usually 1 to 1 inches finished)
One thing to always keep in mind when you are figuring these things out is to add your seam allowance into the equation.
For example, if you want your sashes to be 2 inches finished then you will need a strip that is 2.5 inches wide to start.
For your frame, 1 inch finished would mean you need 1.5 inches of fabric to start.
Attic Window using a Panel
To make an attic window from a panel simply measure the panel you have and figure out how many squares or rectangles you can get out of the panel.
For my panel, it was long and skinny so doing the math I worked out that I could get 15 “windows”. These were cut 7.5 inches square. I cut these out individually, numbered them, and then put them on my design wall right away so as not to get them out of order.
Attic Window Using a Pictural Fabric
When using a fabric with scenes on it like the Tropical Paradise Fabric you have two choices depending on the fabric.
If the fabric has birds and butterflies all over it, you just may want to cut it out and be surprised at the different “window” views you get.
However, if the fabric has “scenes” like the tropical Paradise fabric in my example of above, you may want to choose the scene you want in the window. For this, you would have to figure out the best size of the window to get the best scene and then do the math from there.
Attic Window Block Sashing
There are several ways to make the sashes for the Attic Window Block. The most popular are
- Traditional mitred corner (which I did) using templates I created in the Electric Quilt Software
- The stitch and flip technique
- Half square triangle in the corner
For a demonstration of different techniques to create either the mitred corner or the look of a mitred corner, there is a good YouTube video here.
Warning: The last method shown in this video would NOT work if using a panel!
For my Attic Window Block I used a traditional mitred method however since I designed my quilt using the Electric Quilt software, I was able to create templates for the sashing.
With the templates, I already had my 45degree angle already cut and prepared.
For more information on how I made the mitred quilt block, I have created a how-to PDF
Final Thoughts
I am finding I am loving the variety of attic window quilts I can create using this method and I can see myself making many more. I hope you will give it a go!
Have you made an attic window quilt? Would you? Leave a comment below.
Happy Quilting
To get notification of these posts sign up for the newsletter below
Also, check out the Tips and Tricks section for more helpful hints
Love your newsletter Janice. Sometimes I need inspiration to get started and your ideas are very helpful